==============================================================
PERSEUS
OPERATING MANUAL A site mainly dedicated to Mediumwave Dxing |
==============================================================
NB: FOR UPDATES SEE PERSEUS
RELEASE NOTES
WARNING USE ONLY THE POWER SUPPLY PROVIDED WITH THE RECEIVER. DO NOT CONNECT THE ANTENNA CONNECTOR OF THE PERSEUS RECEIVER TO THE ANTENNA CONNECTOR OF A TRANSCEIVER/TRANSMITTER. DO NOT CONNECT THE RECEIVER TO AN ANTENNA WHICH IS NEAR AN ANTENNA SYSTEM CONNECTED TO A HIGH POWER TRANSCEIVER/TRANSMITTER, IE A HIGH RF FIELD. Failure
to observe the above instructions could seriously damage the receiver.
|
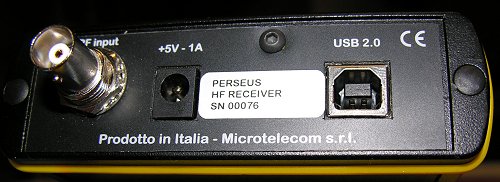 Rear view of the PERSEUS SDR |
DESCRIPTION PERSEUS is a USB2 "black box" SDR (Software Defined Receiver), with the capability of recording 1600kHz of RF spectrum. The receiver is designed to operate on a PC under Windows 2000, XP, or Vista (USB lead supplied). The antenna connection is a BNC socket. (BNC to PL259 adaptor supplied). Power source is an external 5v power supply which comes supplied as standard in the pack. Audio source is via the PC soundcard/ on board audio. Best results are heard by feeding the PC audio through a decent HIFI amplifier and speakers, rather than the standard tinny/ cheap little speakers bundled along with most PCs. (Line out jacks on many PCs are coloured green) Some dxers may prefer the headphone option. INSTALLING
THE PERSEUS SDR
Insert CD driver disk into the PC's CD/ DVD drive before plugging in the Perseus. The standard "Windows has found new hardware" message should come up, and a driver search is performed. The driver installation is only a few kilobytes. Note: If the USB port is changed, windows may require another install of the driver. It will usually be sufficient to allow an automatic driver search, and windows should find the drivers which are already installed. (See detailed installation page above) OPERATION Perseus operating software is freestanding, and does not install any files onto the PC's hard drive, bar adding a registry entry. Simply copy the folder containing the current version of Perseus.exe to a chosen location on the PC's hard drive. (Desktop, or c:/, or which ever user defined location chosen). If files are stored in a location other than the desktop, it may be desirable to have a desktop shortcut. Right click "Perseus.exe" (currently around 2.5MB for PERSEUS 1.0), and click "create shortcut". Right click the new shortcut, cut and paste on to the desktop. Connect a suitable antenna and click on the new shortcut. Audio heard from the PC speakers should now be from the PERSEUS SDR receiver. NB: If recording a wideband piece of spectrum, remember that a tuned antenna will not work, eg a MW loop, which peaks on a single frequency, or an ATU tuned antenna.
TUNING THE PERSEUS SDR Tuning is probably the most important function in any receiver. There are many ways to tune the PERSEUS SDR. 1) Frequency Pane - "mouse over" 2) Frequency Pane - "direct entry" 3) CF step 4) Frequency bar - "dragging" or "mouse over" 5) Secondary BW window and the many adjustments within 6) Main Spect / WFall screen - "mouse over" and "mouse click" 1)
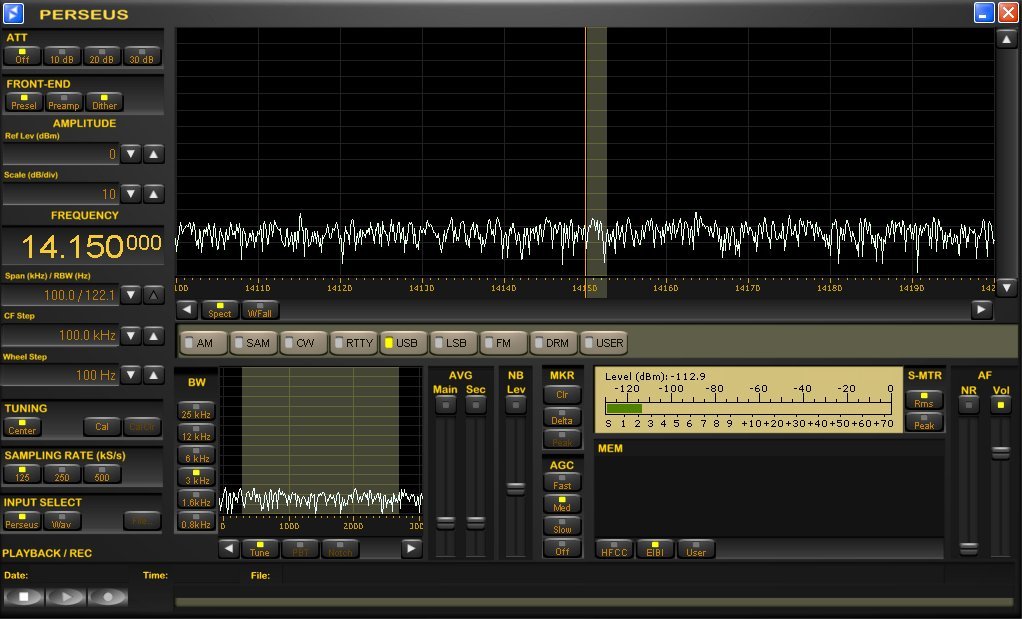
"MOUSE OVER" FREQUENCY PANE:
Hovering the mouse over any of the digits (except 10 MHz) on the "frequency pane", and turning the mouse scroll wheel changes frequency. This is perhaps the most convenient way of tuning the PERSEUS SDR quickly over a large area of the spectrum. NB: Frequency changes depend on which digit the user hovers over. In the image below, "1" in 1530 represents 1MHz. Therefore hovering over "1" and turning the wheel changes frequency by 1MHz at a single wheel click. Mouse over "5" changes frequency by 100kHz per click etc. The frequency will count upwards continuously (or downwards for that matter). If the mouse is hovered over "3" (30kHz) below, and clicked upwards past 9, the next digit will clock up to "6", ie 600kHz.
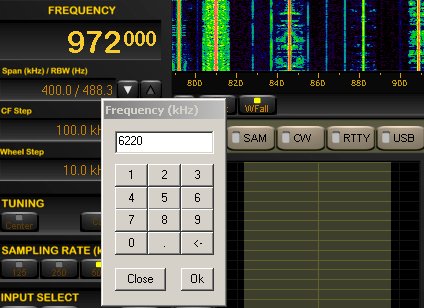
2) DIRECT ENTRY ON FREQUENCY PANE: Double clicking on the "frequency pane" brings up a frequency input window, allowing the user to manually enter a desired frequency. This may be typed directly in to the space at the top, or "mouse clicked" via the numbered buttons below.
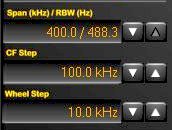
3) CF STEP: White horizontal arrows either side of the "Spect / WFall" select bar (below the frequency bar), tune the receiver up/ down by user selected step, eg 500kHz or 1MHz at a time.
"CF Step" choices are 1MHz, 500, 400, 200, 100, 50, 25, 20, 10, 5, 2 and 1kHz. The buttons to set the CF step are two panes below the frequency. (See above images)
Different steps will be useful to different users. One example could be that a MW dxer is recording a bandwidth of 400kHz just before the top of the hour, to find station ids. He (or she) may wish to move up or down the band by 400kHz to try and capture a completely different set of station ids. (Possibly at the end of the news at 5 minutes past the hour) The dxer could stop the initial recording, and in only one click, move 400kHz down the band to begin recording again quickly. 4) FREQUENCY BAR, DRAGGING OR MOUSE OVER: Dragging: Frequency can be tuned by dragging the frequency bar (see above) located below the main spec / waterfall window. Hold the left mouse button down and drag. Mouse over: If the mouse wheel is turned while the pointer is over the frequency bar, the receiver will tune in "wheel steps" in the same fashion as "mouse over" the main spect/ waterfall window. This step is set in the "wheel step" pane.
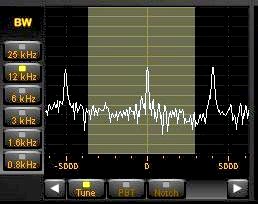
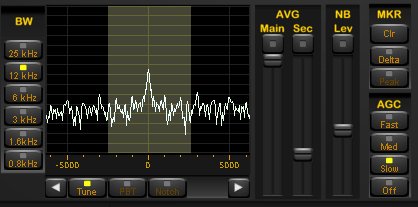
5) SECONDARY FILTER/ BW WINDOW:
FILTER/ BANDWIDTH PANE: Function buttons within the BW pane are "PBT", "NOTCH", "WHEEL STEP TUNE", and "BANDWIDTH" buttons. PBT FUNCTIONS There
are many functions within the BW pane:
f) PASSBAND TUNING: PERSEUS has a right click function
within the BW pane, which moves the whole selected part of the window
around. Right click and hold the shaded area, to drag left or right. This
is the SDR emulation of Passband Tuning, as there
is no real PBT in a zero IF single conversion receiver like Perseus.
NOTCH
FILTER: Introduced since version 1.0, this function can "notch"
out a selected carrier, or area of spectrum close by the desired signal.
The above PBT example worked well with CBC 1070, and the Euros on 1071.
But excellent example of the notch filters use is as follows. Again a
MW example. Until early 2008, many dxers noticed an unidentified carrier
on around 1181kHz. If a European Dxer wishes to listen to WHAM 1180 from
Rochester, NY, the PBT as per the example above could be used to drag
the filter hf to get rid of the Euros on 1179. But what of the unidentified
carrier hf of the desired signal. The notch filter can completely eliminate
this unwanted menace.
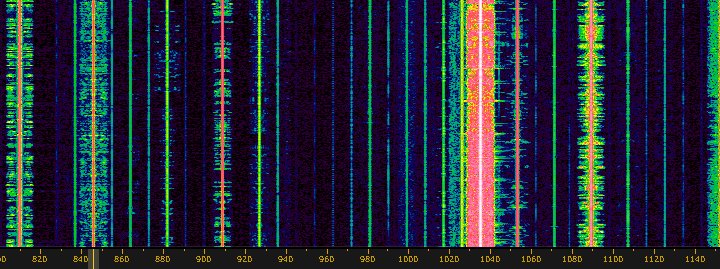
The pointer
is present on the Spect view, and on "mouse over the tuned frequency"
in the waterfall mode. A waterfall screen with a 400kHz span does not
really show up the pointer very brightly against a background of multiple
carriers. The pointer is more obvious on low "SPAN" settings
in the waterfall mode. The pointer changes in conjunction with adjustments
made in the BW pane, and is physically as wide as the selected bandwidth,
as seen within the BW PANE.
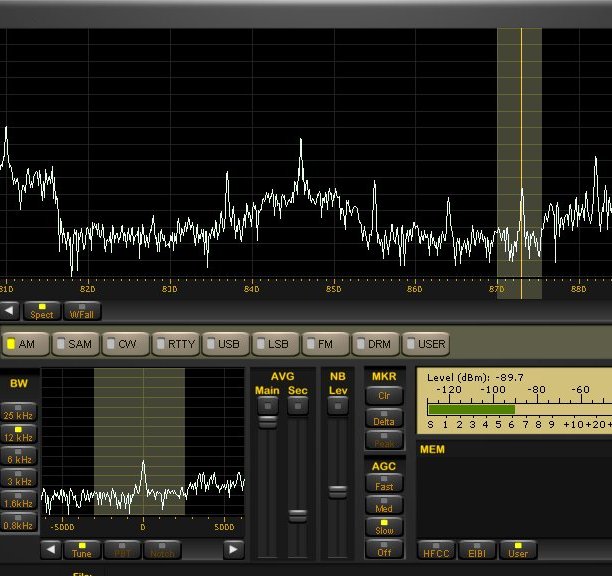
TUNING: Center button - inactive: The user can click anywhere on the waterfall, or spectral screen, and the receiver jumps to the new frequency without moving the whole waveform/ waterfall. The pointer will also move, and can be dragged across the frequency spectrum. MAIN SPECT / WATERFALL DISPLAY There are various functions related to the main window other than direct tuning, see above.
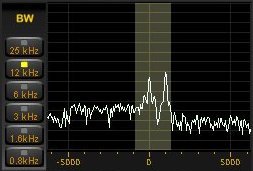
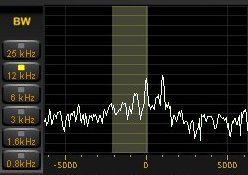
SPAN: This is the bandwidth displayed within the main waterfall/ spectral pane. The selections available are 800kHz, 400kHz, 200kHz, 100kHz, 50kHz, 25kHz, 12.5kHz & 6.3kHz, 3.1kHz. A 1.6kHz span is available only when the receiver sampling rate is set to 500kHz or less. A 0.8kHz span is available only when the receiver sampling rate is set to 250kHz or less. A 0.4kHz span is available only when the receiver sampling rate is set to 125kHz.
SPAN could also be described as increasing the magnification on the Spec/
Waterfall screen. This function can be used on playback as well as live
listening. SPAN is directly related to the sampling rate setting. The
waterfall can not show 400kHz if for example the receiver is only sampling
250kHz at the time. (Or is playing back a recording of 200kHz of spectrum)
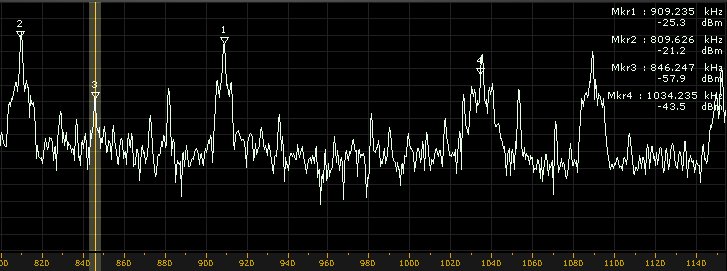
MKR: There are three buttons in the MKR pane. CLR, DELTA, and Peak. CLR: This clears the Mkr arrows from the spect/ waterfall display. DELTA: This button changes the values from the markers 2, 3 and 4 to delta values (Different to MRK 1) PEAK: AVG MAIN: Stabilizes the spect waveform in the main spect/ waterfall display. Will also stabilize the waterfall mode. AVG SEC: Stabilizes the spect waveform in the secondary “bandwidth” display/ pane. This function does not switch back on by default when the software is restarted.
RECORDING
/ PLAYBACK
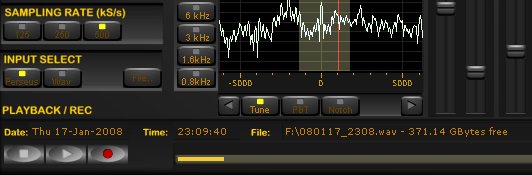
According to an on line poll, the biggest attraction to PERSEUS is the record feature. Technology has advanced enough to enable the PERSEUS SDR to record a massive 1600kHz of the RF spectrum, and play back the file at a convenient time, with all the desired features of the receiver still available to optimise reception, eg bandwidth, mode, passband tuning, etc. This spectrum record function has particular interest to DXers whose main focus is MW or Tropical Bands, though not of course exclusively. (The receiver has even been tested as a BAT DETECTOR!!) Perseus can record a spectrum bandwidth of 1600, 800, 400, 200, or 100 kHz. This is selected from the SAMPLING RATE buttons. These are marked 2000, 1000, 500, 250, and 125, which is the amount of spectrum the receiver is sampling per second. These figures may seem slightly misleading, as the Perseus will playback slightly less than the sampling rate. These playback values are as follows: 1600kHz at 2000kHz sampling rate 800kHz at 1000kHz sampling rate 400kHz at 500kHz sampling rate 200kHz at 250kHz sampling rate 100kHz at 125kHz sampling rate
The PERSEUS will record up to a maximum of 10 minutes, before automatically creating a new (.wav) file. After 10m a new file is created with the same name "plus 1". 080117_2308.wav file is the example below. The next file becomes 080117_2309.wav. The file size of an automatic 10m recording is around 1.757GB at 400kHz, 878MB at 200kHz, and 439MB at 100kHz of spectrum recorded.
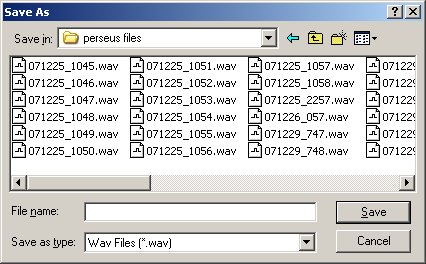
RECORDING: To record from the PERSEUS, select the chosen frequency limits required in the main window, by dragging the frequency bar. Click on the record button, which is third from the left at the bottom of the screen. A new window pops up asking for a user defined file name and folder location to store the file (see below). As seen in the example above, the file may be named to include the date and time, for ease of finding. The example above is called 080117_2308, meaning the file was recorded on January 17th 2008, at 2308UTC. The PERSEUS takes the file time from the computer clock, so it is a must that the PC clock be kept accurate. The software also displays how much free space is left on the hard drive. In the case above, 371.14 GBytes are free.
NB: While recording, it is NOT possible to tune around beyond the frequency limits of the spectrum being recorded, eg the user can not check a SW frequency while recording say 560 - 960kHz. The same of course stands for playback. It is not possible to tune beyond the recorded frequencies. PLAYBACK: To play back a file which has been recorded at an earlier time, click on the "Wav" button, within the "INPUT SELECT" pane. The PERSEUS stops receiving live signals and the "Wav" and "File" buttons are now activated. Click "File" and browse on the PC to the location of the pre recorded file(s). Then simply press the PLAY button. These buttons are similar to those found on most domestic DVD players and video recorders. If the receiver has created numerous automatically named files, PERSEUS will playback the whole series of files if required. This playback should be continuous and flawless, even during track/ file change. The PERSEUS software will playback .wav files which have been copied to a DVD equally as flawlessly.
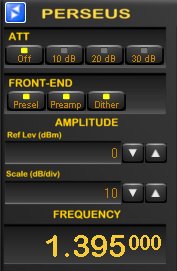
During playback, the Perseus software will display date and time in the same format as during recording. Therefore so long as the PC clock has been kept accurate during recording, so too will the playback time. A PC clock sometimes becomes wildly out of time, especially in the mid winter cold of a radio shack. This also means that windows automated file date of creation will be wrong. A replacement back up battery on the PC motherboard may be required if the clock goes off time frequently. NB: Playback is restricted to the PERSEUS hardware being connected and running on the PC. The software will not activate if the PERSEUS is not connected to the PC. MOVING FORWARD AND BACK DURING PLAYBACK: Since software version 1.0, single left click anywhere on the progress bar to advance to a chosen point of the recording. To loop the playback over a smaller selection, simply left click and hold at the desired spot on the progress bar. Drag the mouse pointer along to the right to create a new line, which will be a much paler shade of yellow, almost see through. Let the mouse button go, and playback immediately begins from the new desired spot. This should be flawless and instant. The player will repeat the new selected section only over and over until stopped. This may be useful if the user wishes to repeat a possible station ID over and over again. A left click on the line cancels the new selection, and returns the playback to the beginning of the file. NB: The progress bar differs slightly in operation from common progress bars in WINAMP, or WINDOWS MEDIA PLAYER for example. TROUBLESHOOTING: If the user fails to create a new line, but only "clicks" to attempt to advance playback by a few minutes, the software may seem to "stick". The player is probably only playing back a very small selected area over and over again, and hence the impression of "stuttering and jamming". THE OTHER CONTROLS A detailed description of the other controls on the software control panel, beginning at the top left of the screen: ATT: Like on a conventional receiver, the attenuator reduces signal input. This may be useful if a user has problems with strong local signals appearing on frequencies other than their own. eg from a local radio ham, or local MW station. Relays are heard clicking in the PERSEUS unit when the attenuator is switched in and out. FRONT END: Presel Preamp and Dither: Under normal conditions, these functions may seem to make little difference. There are however, situations in which their use becomes apparent. "Presel" (which inserts the receiver preselection filters) is very useful when very strong out of band interfering signals may saturate the A/D converter. Eg, if the user is tuned to MW, while a radio amateur very close by is active on 160 or 80metres, and breaking through. Switch in the Preselector in this instance to prevent or reduce overloading. "Preamp" is less noticeable as it varies the receiver sensitivity just slightly, no more than 2/3 dB. It may be difficult to notice any real difference when broadcast listening signals are very strong, and atmospheric noise is far beyond the receiver's own noise level. "Dither" reduces spurious signals. Spurious responses are improved at the expense of the receiver sensitivity (only a couple of dBs). Users may have this function "always on" unless tuned for example to a very quiet 10m band.
AMPLITUDE:
Both "ref level" and "scale" alter the height and
position of the dancing waveform in the Spectral wave mode on the main
panel as well as the waveform in the secondary “bandwidth”
window. MODE:
The reception mode buttons (AM, SYNC AM, CW, RTTY, USB, LSB, FM, DRM,
USER) are placed along the centre of the screen.
Cal
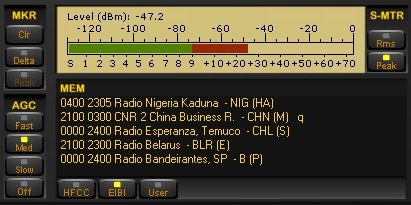
and Clr: An example of how to calibrate the PERSEUS SDR. NB LEV: MEM box: There are three function buttons associated with the MEM BOX; "HFCC" "EIBI" & "USER". The PERSEUS operating software displays information from the "HFCC" and "EIBI" on line frequency databases. So long as the text files are composed in the same format as the HFCC database, the user can produce his own personal database. The user database file should be named "userlist.txt", and kept within the PERSEUS folder.
As seen in the example above, when a frequency listed in the database
is tuned, the entries are displayed in the MEM window. Station names appear
if the tuning frequency is within +/- 500 Hz of the frequency listed in
the database. Stations scheduled at 1200UTC for example, do not show in
the MEM window at 2100UTC. Time
& even day of the week of stations appearing in the window match time
and day displayed by the PC clock.
FACTORY DEFAULT SETTINGS / DELETING REGISTRY KEY: To reset the software to its factory default, you need to delete a "key" in the Windows registry as follows: 1)
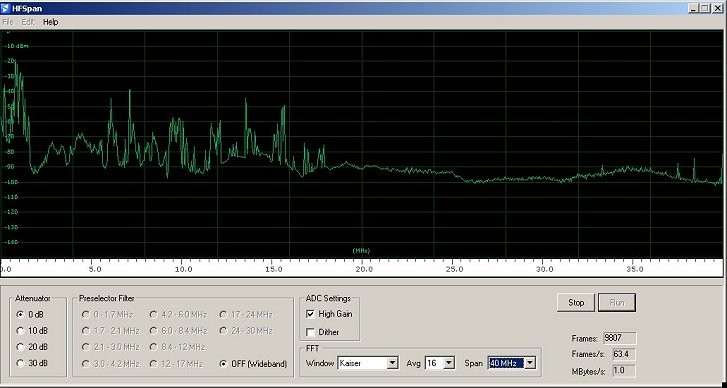
Close the Perseus software. 3) Delete the folder "v1.0" (and if you wish it so, the full microtelecom folder) 4) Restart the Perseus software. HFSPAN HFSpan is a stand alone spectrum analyser, which is included along with the PERSEUS operating software. It is available on line. along with the latest operating software. HFSpan is also included on the CD that ships with the PERSEUS SDR receiver. HFSpan will display 10, 20 or the maximum 40MHz spectrum. The frequency bar can be dragged when the bandwidth is set at 10 and 20MHz. To start HFSpan, switch off "PERSEUS.exe", and double click (or right click and open) "HFSpan.exe". The PERSEUS operating software does not run in conjunction with the HFSpan software.
WINRAD: INSTALLATION FOR PERSEUS After PERSEUS drivers are installed, and the PERSEUS software is running smoothly, some users may wish to experiment with the WINRAD interface. WINRAD is a software application developed by Alberto di Bene, I2PHD, and is available from the following web address: http://www.winrad.org/winrad/ RUNNING
PERSEUS through WINRAD: TECHNICAL
SPECIFICATIONS
All specification are measured at 14.15 MHz, with Preselector ON and Preamp OFF, unless otherwise indicated. EC CONFORMITY Microtelecom s.r.l. declares that the Perseus receiver complies with the European Community EMC standards: ETSI EN 300
330-1
|
||||||||||||||||||||||||||||||||||||||||||||||||||||||||||||||||||||||||||||||||||||||||||||||||||||||||